Seeing a 403 forbidden error?
It means your server is working, but you don’t have permission to access the web page due to the wrong permission or a corrupted .htaccess file.
These are the most common reasons. But in some cases, other reasons can be involved.
Like plugin conflicts, hotlink protection, IP blocking, etc.
Now let’s jump into solutions.
Table of Contents
How To Fix 403 Error GoDaddy
Quick Fixes You Can Try:
✅ Check index file name case – Make sure it’s lowercase (like index.php).
🌐 Wait for DNS propagation – Happens after domain or hosting setup; can take 12–24 hours.
🔗 Avoid hotlinking – Don’t use images/videos hosted on other servers with protection.
🚫 Unblock your IP – Use Jetpack or Wordfence whitelist if plugins are blocking you.
⚙️ Inspect your CDN – Disable it temporarily and see if the issue goes away.
🔒 Fix file permissions – Files: 644, Folders: 755, wp-config.php: 440.
🧹 Rebuild .htaccess – Delete the current one, then refresh permalinks in WP settings.
🧩 Check plugins – Deactivate all, then reactivate one by one to find the culprit.
🎨 Switch to a default theme – To rule out theme-related issues.
This guide walks you step-by-step to diagnose and resolve all possible causes so you can get your site back online fast.
1.Check the Case of Your Index File
Linux is a case-sensitive language.
If your index file (index.html, home.html, index.php, etc.) is not in the appropriate case, convert it to lowercase.
Here, we can help you recognize the index file as it varies.
For Plesk on Linux hosting, it can be like one of these:
Index.html
Index.htm
Index.cfm
Index.shtml
Index.shtm
Index.stm
Index.php
Index.php3
Index.asp
Index.aspx
Default.htm
Default.asp
Default.aspx
On cPanel, You can see something like that:
index.html.var
index.htm
index.html
index.shtml
index.xhtml
index.wml
index.perl
index.pl
index.plx
index.ppl
index.cgi
index.js
index.jp
index.php4
index.php3
index.php
index.phtml
default.htm
default.html
home.htm
index.php5
Default.html
Default.htm
home.html
 In WordPress, index.php is the index file that commands WordPress to use the theme and load the WordPress environment and template. You can find it at Webroot.
2.Complete DNS Propagation
If you have purchased a new domain or GoDaddy web hosting plan, update DNS records like A records, CNAME records properly, etc., and wait for a few hours.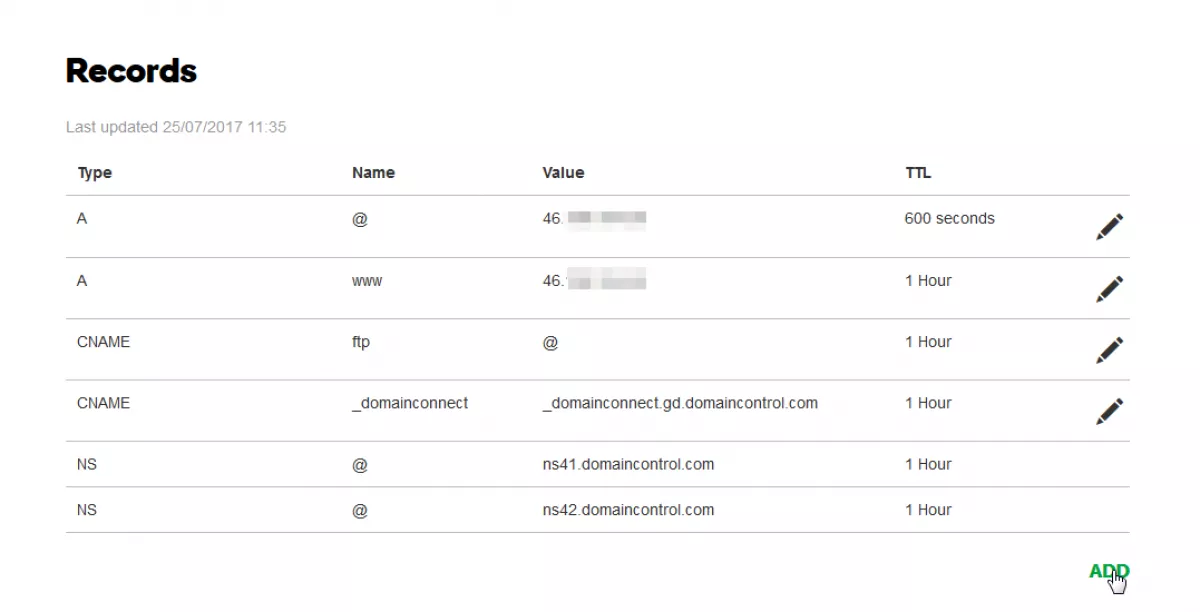
Generally, DNS propagation takes 10–12 hours to be completed, but sometimes it can last 24 hours.
3.Don’t Host Third-Party Content That is Hotlink Protected
Hotlink protection is a fantastic feature on the internet to protect your resources, like videos or images, from linking to other websites.
It saves your costly bandwidth, refrains from unintended server loads, and returns 403 errors.
Check carefully if some image or video is loading from someone’s server and getting 403 errors. It means these are hotlink protected.
So it’s better to host these on your server rather than linking. First of all, get the permission of the content owner. Then download and upload these to your server.
However, the issue does impact the whole site instead of some parts of some posts.
4.Unblock Your IP Address
There are many security plugins available to protect your WordPress site, and it is good to have it for protection from brute force, bot traffic, and XSS attacks.
It blocks spammers or bots’ IP addresses to save our web property.
But sometimes, it can block real human IP addresses owing to buggy malware signatures and throw 403 errors.
So you will need to add your IP address to their whitelist. They will take care of you next time.
If a popular Jetpack plugin has blocked you, the following instructions can help you:
(1)Login to WordPress.com
(2)Visit My Sites > Setting> Security > Whitelist
(3)Now enter your IP and save it.
(4)Don’t know your IP address? Google ‘what is my address’.
Another way to resolve it is by adding a code line to the config.php file.
define('JETPACK_IP_ADDRESS_OK', 'YOUR IP ADDRESS');
In the market, the Wordfence Security plugin is one of the big players and, most of the time, deploys 403 denied access for an actual human if we enable complete protection, as I have suffered on many client sites.
(1)Login to cPanel
(2)Access File Manager
(3)Go to the plugin folder and rename the Wordfence plugin name. It will deactivate it.
(4)Now, you can access your website.
(5)Install Wordfence Assistant and remove the Wordfence blocking IP list from your server.
(6)Now, you can activate Wordfence Security Plugin
(7)Navigate to Firewall>All Firewall Options
(8)Add your IP address to the plugin’s Allowlist.
5.Check Your CDN
Getting 403 errors on your CSS, images, JS or PHP, or anything served through CDN.
There is a high probability that your CDN is the culprit.
In this case, you should switch off the CDN to see how your website works.
Working fine?
Check your CDN plugin, update it and at last, you should query your CDN support team to resolve it.
6.Properly Set Permissions
There are many vital files like wp-config.php, .htaccess, plugins folder, etc., in WordPress that should not be accessible to the public.
On the other side, images, CSS & JS files of themes, plugins, etc., should be open to the public.
Then a website can run properly in the user’s browser.
In that case, permissions, a fantastic WordPress feature, play a significant role in setting up accessible or non-accessible permissions for any particular file or folder.
The feature also gives write and execute permission, denoted by a three-digit number.
However, WordPress setup standard permissions on installation. It is like that-
File – 644 or 640
Folder – 755 or 750
wp-config.php – 440 or 400
If the permission is messed up, it can cause 403 errors. To fix it, follow the instructions:
(1)Access file manager
(2)Select any file and right-click
(3)Choose file permission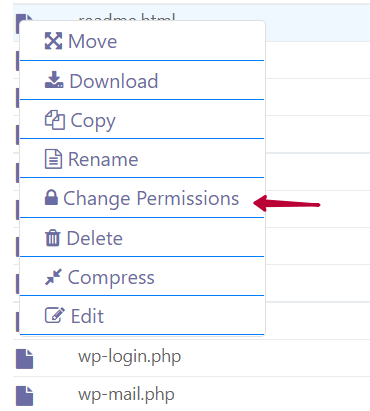
(4)Set 644 or 640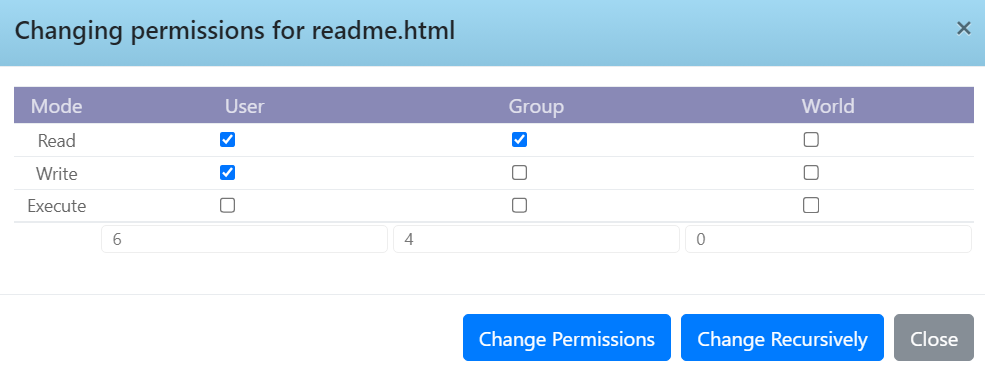
Repeat the steps for the folders and wp-config.php.
7.Create a Fresh .htaccess File
The.htaccess file is a basic configuration file used by Apache and LiteSpeed servers. The file stores browser caching rules for assets like images, CSS, js, etc. and redirects, which are essential for web and SEO performance.
But it is severely critical, as a simple error can pose a forbidden error. To resolve it, we need to invoke the new.htaccess file.
(1)Go to public_html
(2)download the .htaccess file and delete it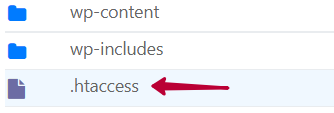
(3)Now WP-admin will be accessible; go to Settings > permalinks
(4)Click on Save Change.
It will create a new.htaccess file.
8. Find out Rogue Plugins
A problem plugin can reiterate the error. You can find out one easily by following the deactivate and test process.
A plugin becomes rogue due to poor coding, buggy updates, and conflicts with other plugins.
9. Check Theme Compatibility
Like plugins, themes can be problematic for the same reasons, and you can troubleshoot them.
FAQ
1. Why am I getting a 403 forbidden error on GoDaddy?
The 403 error usually appears when your server blocks access due to incorrect file permissions or a corrupted htaccess file. In some situations, it can also happen because of plugin conflicts, IP blocking, hotlink protection, or CDN filters. Once you identify the real trigger, the fix becomes quick and straightforward. This guide walks you through every possible cause.
2. How do I fix the 403 error caused by a corrupted .htaccess file?
A broken .htaccess file is one of the most common triggers of the 403 error. Simply delete the existing file from public_html, then open your WordPress dashboard. Visit Settings and then Permalinks and click Save Changes. WordPress will generate a fresh .htaccess file automatically, and your site should begin loading normally.
3. Can wrong file permissions really cause a 403 error?
Yes, incorrect permissions are a major factor. WordPress needs correct read, write, and execute rules to function properly. Files should be set to 644 or 640, folders to 755 or 750, and wp-config to 440. If permissions are higher or lower than they should be, the server blocks access and shows a forbidden message. Adjusting them in the File Manager usually fixes the issue instantly.
4. Do plugins cause 403 forbidden errors?
Security plugins can mistakenly block your IP or restrict access to important files. Jetpack and Wordfence are known to trigger 403 errors when their rules get too aggressive. To fix it, whitelist your IP address or temporarily deactivate the plugin by renaming its folder. After regaining access, review the plugin settings or reinstall it to clear faulty rules.
5. Can a CDN trigger the 403 forbidden problem?
Yes, a CDN can block access to your CSS, JS, images, or even PHP files if it detects something unusual. The fastest way to confirm this is by turning off your CDN temporarily. If your website loads fine after disabling it, update your CDN settings or contact their support team for a cache clearance or rule reset.
6. How do I know if the error is caused by DNS changes?
If you recently purchased a domain or migrated to new hosting, DNS propagation may still be underway. During this period, some users may see the site, while others get a 403 forbidden error. DNS propagation generally takes 10 to 24 hours. Simply wait for the records to settle, and the website will start loading normally worldwide.
Have your issues been resolved? Please share, and do let me know in the comment box.
More Fixes:-
- [Solved] GoDaddy 502 Bad Gateway WordPress
- [Solved] GoDaddy WordPress Site Slow, Now Load in 1s!
- [Solved] 500 Internal Server Error WordPress GoDaddy
- [Solved] GoDaddy 503 Service Unavailable
- [Solved] Godaddy Error Establishing a Database Connection in WordPress

Ravi Kumar is a Server Performance Analyst with over 4 years of experience benchmarking cloud infrastructure. He has optimized and stress-tested over 150+ websites, digging deep into uptime, disk latency, and CPU performance. Whether you’re looking for a free trial or a high-performance production server, Ravi uses real-world data to help you find the perfect host.